Showing posts with label Dips and Spreads. Show all posts

Tuesday, January 26, 2010

Renaissance Cook Challenge: A Three-Course Meal Inspired by Three Dynamite Ladies


Last night I completed my own entry for the Renaissance Cook Challenge. I had originally planned to base each course of the meal on a cherished piece from my own wardrobe, but then thought hey, why not spread a little love and plug some dynamite style bloggers instead?


The appetizer course was based on this post by Jessica Schroeder of What I Wore. Jessica's style appeals to me because, well... she IS me. She's in her mid-twenties (check), loves vintage clothing (check), believes that personal style should not be wholly governed by trends (check- check), and believes that one need not be uber-wealthy to be uber-classy (check-check-double-check). She suggested I invent "something spicy" based on the outfit pictured. I was happy to oblige, as it's one of my favorite combos of hers.

Roasted Tomato Salsa
Inspired by Jessica Schroeder

Ingredients

1 large tomato, cut in half
2 thick slices of onion
Salt, black pepper, and dried cayenne pepper to taste
1 head garlic
2 Tbsp. olive oil
Juice of 1/2 a lime
1/2 c. cilantro leaves
Splash sherry vinegar

Directions

Heat the oven to 425.

Season the tomato halves and onion slices with salt, pepper, and cayenne. Peel the outer layer of skin from the garlic, leaving the cloves attached to the head. Arrange the tomato, onion, and garlic in a roasting pan and drizzle the olive oil over. Roast 30 minutes.

Remove pan from oven and allow to cool. Transfer the tomato and onion to a food processor or paddle blender. Add the pulp from the garlic cloves, discarding the skin. Add the lime juice, cilantro, and vinegar.

Pulse on medium speed about 3-5 times, or until the salsa has reached its desired chunkiness. Scrape the salsa into a container with a lid, seal tightly, and chill. I made mine a day in advance so that the flavors would have plenty of time to get to know one another, but a couple hours' chilling time would suffice. Serves 6-8 as an appetizer.


My entree took its color cues from this "costume of the day" posted by Kelly Framel, aka The Glamourai. When she's not working her day job as a stylist, Kelly breathes new life into vintage jewelry, which you can find for sale at Shrimpton Couture and The Glamporium. She did not have any special requests as far as what dish I made in honor of her, so I picked an outfit I loved and carried on with the Southwest-ish culinary theme.

Pork Loin Spirals With Corn and Black Beans
Inspired by Kelly Framel

Ingredients

1 c. black beans, cooked
1 c. corn, fresh shucked or thawed frozen
1/4 c. olive oil, plus extra to baste
2 Tbsp. sherry vinegar, plus extra to de-glaze
1 Tbsp. cumin
1 tsp. dijon mustard
1/4 tsp. salt, plus extra to season the meat
1/4 tsp. pepper, plus extra to season the meat
6 large garlic cloves, minced
Zest of 2 lemons, grated or minced
Juice of 1/2 lemon
4 inches fresh ginger, grated
2 pork tenderloin fillets, weighing about 1 1/4 lbs each
1/2 c. Manchego cheese, diced small

Directions

Mix all ingredients except the pork loin and Manchego in a container with a lid. Store in the fridge to marinate for 8-48 hours, stirring periodically.

Around the same time you assemble the filling, cut into each pork loin lengthwise. Stop at least 1/4" short of cutting it in half. Make another incision from the center moving outward. Again, do not cut all the way through. Unfold. Each loin should now be about 4 times its original width.

Spread the meat on a hearty surface that can take a good pounding. Cover it in plastic wrap and bang it with a mallet until it's good and flat. Season with salt and pepper. Store in the fridge until ready to cook.

Heat the oven to 400.

Saute the marinated filling over medium heat until the garlic grows soft and flavors the other components. Deglaze with additional sherry vinegar if necessary. This will take about 5-7 minutes, but if you were a chickenless cook, you would taste as you go ;)

Spread the pork flat in an oiled baking pan. Allow the filling to cool a few minutes, then divide it evenly between the two fillets and spread it over, leaving a border of 3/4" to 1". Sprinkle on the cheese. Roll the loins up lengthwise and secure with 6 or more pieces of kitchen twine each. Baste each loin with a bit of olive oil. Roast about 1 hour. Remove the twine and cut into rounds from top to bottom. Serves 6-8.


Dessert was inspired by this frock posted by Fleur de Guerre of Diary of a Vintage Girl. She, like Kelly, gave me free reign to choose from her oodles of fabulous photos. I imagine this one wouldn't have been her first pick; she's a self-described "part-time pinup girl and full-time Forties enthusiast," and this look is more 50s. But I'm sure she'll approve of the azure after-dinner cocktails I served in her honor.

Blue Hawaiian Pina Coladas
Inspired by Fleur de Guerre

Ingredients (Alcoholic Version)

4 oz. rum
2 oz. blue curacao
6 oz. unsweetened coconut milk
1 c. fresh pineapple chunks
1 1/2 Tbsp. sugar or simple syrup
10 ice cubes

Ingredients (Kid-Friendly Version)

6 oz. whole milk
6 oz. unsweetened coconut milk
1 c. fresh pineapple chunks
2 Tbsp. sugar or simple syrup
A few drops blue food coloring
10 ice cubes

Directions

Place all ingredients in a blender and run on high until smooth. Serves 4 (or 2 double-tall as pictured).

Thanks to everyone who participated in this challenge! If you haven't participated yet and you live on my side of the globe, it's not too late. Your time isn't up until the day is over...


Beat the eggs. Whip the cream. Show no mercy.


Tuesday, December 29, 2009

Christmas Presents


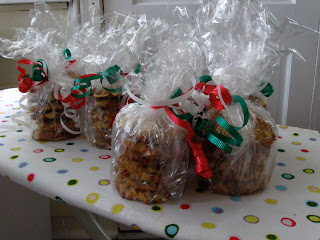
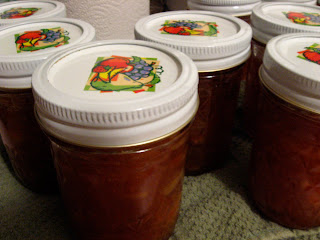
Another year of no money, another year of packaging cheap homemade foods up pretty and calling them gifts. This Christmas it was jam and cookies.

I had made jam before, but never canned it, and was excited to try. This recipe for Florida Citrus Marmalade (see below) was inspired by a recipe for Cranberry Orange Marmalade on page 188 of a Cooking Light holiday edition from November/December 2007. I wanted to see if I could achieve sufficient tartness using grapefruit and key limes instead of cranberries, which aren't native to Florida. In the future I may increase my limeage, but it came out pretty well for a first attempt.

As for the cookies, I made these of the potato chip variety (thanks a million to Brie le Grand Fromage!) and added chocolate chips. I wanted to dip them in chocolate, but there would be days' worth of car travel before many of these packages reached their destinations. As my Florida readers can tell you, the weather fluctuates like mad at this time of year, so I wouldn't want to risk making a melt-prone gift.


Here's what my kitchen looked like while I was making the cookies. Thought you may get a kick out of it:


Florida Citrus Marmalade

Ingredients

8 lbs. navel oranges (about 14 oranges)
2/3 of a ruby red grapefruit
6 key limes
6 c. sugar, divided
3 c. water


Directions

Zest two oranges and two limes. Remove peels from these and all other fruits. Chop the fruit and remove all seeds.


Combine chopped fruit and zest in a large saucepan with water and 2 cups of the sugar. Bring to a boil, then reduce heat to medium-low and simmer 15 minutes.

Add remaining sugar. Simmer approximately an hour and a half.


Meanwhile, sanitize your canning equipment. Pre-wash all jars, lids, and bands with antibacterial dish soap and water. Fill a pot with enough water to completely submerge your jars. Bring to a boil over medium-high and place jars, lids, and bands gently in the boiling water for five minutes or more. For the last minute or so, lower the end of a pair of tongs into the boiling water. When time is up, use the sanitized tongs to remove each piece from the pot and place it on a clean towel.

Spoon jam into the jars while still hot. Wipe anything that spills over the edge with a clean damp towel. Put on the lids and secure with the bands.

Lower jars gently back into the boiling water. Boil for ten minutes, then remove carefully with the tongs and place back on the towel. (The towel is there as a buffer between the hot jar and the cold countertop, a trick I learned from Alton Brown via a recommendation from Peas Love Carrots. This helps prevent spontaneous shattering). A couple hours later, check the tops to be sure they have sealed. If the button doesn't bounce back when you push it, hooray! Your jam will keep in the same condition for about a year. This recipe makes about a dozen 8-oz jars.


I had a jar left over for myself and my husband. Before I left to visit family on Christmas Eve, I had some for breakfast over toast and melted havarti. Yum! A little too sweet, but overall... yum!


Beat the eggs. Whip the cream. Show no mercy.


Wednesday, September 23, 2009

Baba Ganoush Floridian with Black-Eyed Peas and Rosa Bianca Eggplant


I am happy to report that one of the main components of this dip/spread, the rosa bianca eggplant, was purchased at my farmers' market from a grower out of Lake Wales (approximately forty-five-minutes from my Orlando home). The black-eyed peas, however, I am not sure about. I bought them at Publix, which is one of the most popular grocery chains down here in the Southeast. The label claimed they were "distributed by Publix Supermarkets/Lakeland, FL." On the one hand, there is a good possibility that they were grown in Lakeland; many of the chain's generic products are. But if they weren't... do I really want to support that kind of local-washing? Not to mention the fact that Publix is a far-reaching corporation; a shopper in Tennessee can purchase the very same beans that I can. Which I definitely don't support. When you spend money on produce, it should go back into your community, not into the pocket of a CEO thousands of miles from you.

The only sure way to avoid inadvertently contributing your dollars to this practice is to grow it your damned self. My husband and I have decided on a tentative design for our backyard garden, which is based on the mandala model he read about in The Permaculture Home Garden by Linda Woodrow. However, it will also make use of aquaponics, a principle we are currently learning from Toolbox for Sustainable City Living, which I mentioned a few days ago in this post. (So far it's a fascinating read... will have the book review up soon!)

I cannot tell you how badly I am geeking out over this. Someday soon I will be using my own black-eyed peas in this recipe. No more dependence on big chains. No more wussiness. Only tasty, tasty baba ganoush.

Baba Ganoush Floridian with Black-Eyed Peas and Rosa Bianca Eggplant

Ingredients

1 medium rosa bianca eggplant, cubed
1 1/2 c. fresh or reconstituted dried black-eyed peas
1 large or 2 small cloves garlic, pressed
1 Tbsp. tahini
1/3 c. plain yogurt (whole milk or oikos)
1/4 tsp. black pepper
Salt to taste

Directions

Preheat oven to 425. Salt eggplant cubes and roast in a single layer on a nonstick surface for 20 minutes. Meanwhile, simmer the black-eyed peas in water or stock over medium heat until soft. They should be done around the same time as the eggplant. Let both cool completely before proceeding.

Drain the beans, reserving 2 Tbsp. liquid. Place all ingredients, including reserved bean liquid, in a food processor and process until well-blended but still thick. Complements crudites, pita triangles, toasts, and other appetizer foods; also makes a delicious sandwich spread. Black-eyed peas loooove spice, so try sauteing a chopped or sliced jalapeno with onions or garlic as a topping. Serves 6-8.


Beat the eggs. Whip the cream. Show no mercy.