Wednesday, January 27, 2010

Ubergrun Chili


One thing I love about the German language (and subsequently the English language, though we don't do it nearly so much these days) is that new words are incorporated all the time just by smashing some together that already exist. Here I've used the adjective "ubergrun" to mean "intensely green," referring to the fact that five out of the seven whole food ingredients in this chili are of that persuasion.


While fighting off the cat in order to lick my bowl clean, I was uberpissed to learn from my husband- the Orlando Weekly's calendar editor and social butterfly extraordinaire- that there will be a chili cook-off this weekend. Why pissed? Because just when I finally invent a chili I'm proud of, and just when a chili cook-off finally happens in my neck of the woods... we won't be in town. On Friday, we hop a plane to Colorado and pay an off-season visit to some of the farms at which we've applied to intern. (That, or sit around in the airport all weekend waiting for a plane that's been delayed by an uberblizzard up in Denver.)

Joking aside, I'm ecstatic about this trip! If you'd like to read about the places we'll be touring, please pop on over to Doveland Farm and peruse some of my husband's recent posts.

I know, I know... enough with the blog plugging already. Bring on the uberdelicious chili recipe!

Ubergrun, Uberdelicious, Geez-I'd-Better-Stop-Saying-Uber-Before-I-Offend-a-Real-German Chili

Ingredients

2 Tbsp. olive oil
1 yellow onion, diced large
1 stalk celery, sliced
1 Anaheim chile pepper, diced small
2 large cloves of garlic (or 3-4 non-ubercloves as pictured... gah, there's just so many appropriate places to say uber!), chopped
3 tsp. dried cumin
1 3/4 c. broccoli florets
1/2 c. cilantro leaves, chopped
Salt 'n' pepper to taste
1 1/4 c. black beans, cooked
2 Tbsp. sherry vinegar
3 medium to large green tomatoes, diced (approximately... I used two big ones from the farmer's market and five little ones my mom gave me from her garden)
2 tsp. orange blossom honey


Directions

Heat the olive oil in a large saucepan on medium-high. Add the onion, celery, chile, garlic, and cumin. Saute 2 minutes.

Add the broccoli florets and saute a few minutes more, until the onion is translucent and the broccoli is tender.

Add the cilantro, salt, and pepper; seasoning to your preference as if you intend to eat it as is. (Yes, there are still some ingredients to add, but when the water contained in the vegetables evaporates, you will be left with perfectly salted chili). Saute one minute more, then stir in the black beans.

Pour in the sherry vinegar and deglaze the pan.

Stir in the tomatoes, reduce the heat to medium-low, and cover the pan. Simmer 40 minutes. Add the honey and taste one more time to see if you need any more salt. Simmer, covered, 10 minutes more. Serves 3-4 (number of servings can be augmented to a solid 4 if you ladle it over rice, potatoes, cornbread, meat, etc.)


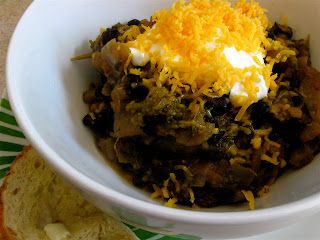
Don't get me wrong, the flavor of this chili was amazing; but in case you hadn't noticed, it's quite mild. I got an ubercramp in my wrist from shaking hot sauce into my portion. If I were to enter it in the cook-off, I would add a couple jalapenos for heat.

Okay, gonna stop saying uber now...

Dang, just said it again.

Okay... NOW!

Addendum: Huh, looking back on this, I'm not sure what all I'm counting as a "whole food" ingredient here... I didn't count my black beans because they came from a can, but there were no salt or preservatives added, so... meh? What do you guys count as whole food?


Beat the eggs. Whip the cream. Show no mercy.


Tuesday, January 26, 2010

Renaissance Cook Challenge: A Three-Course Meal Inspired by Three Dynamite Ladies


Last night I completed my own entry for the Renaissance Cook Challenge. I had originally planned to base each course of the meal on a cherished piece from my own wardrobe, but then thought hey, why not spread a little love and plug some dynamite style bloggers instead?


The appetizer course was based on this post by Jessica Schroeder of What I Wore. Jessica's style appeals to me because, well... she IS me. She's in her mid-twenties (check), loves vintage clothing (check), believes that personal style should not be wholly governed by trends (check- check), and believes that one need not be uber-wealthy to be uber-classy (check-check-double-check). She suggested I invent "something spicy" based on the outfit pictured. I was happy to oblige, as it's one of my favorite combos of hers.

Roasted Tomato Salsa
Inspired by Jessica Schroeder

Ingredients

1 large tomato, cut in half
2 thick slices of onion
Salt, black pepper, and dried cayenne pepper to taste
1 head garlic
2 Tbsp. olive oil
Juice of 1/2 a lime
1/2 c. cilantro leaves
Splash sherry vinegar

Directions

Heat the oven to 425.

Season the tomato halves and onion slices with salt, pepper, and cayenne. Peel the outer layer of skin from the garlic, leaving the cloves attached to the head. Arrange the tomato, onion, and garlic in a roasting pan and drizzle the olive oil over. Roast 30 minutes.

Remove pan from oven and allow to cool. Transfer the tomato and onion to a food processor or paddle blender. Add the pulp from the garlic cloves, discarding the skin. Add the lime juice, cilantro, and vinegar.

Pulse on medium speed about 3-5 times, or until the salsa has reached its desired chunkiness. Scrape the salsa into a container with a lid, seal tightly, and chill. I made mine a day in advance so that the flavors would have plenty of time to get to know one another, but a couple hours' chilling time would suffice. Serves 6-8 as an appetizer.


My entree took its color cues from this "costume of the day" posted by Kelly Framel, aka The Glamourai. When she's not working her day job as a stylist, Kelly breathes new life into vintage jewelry, which you can find for sale at Shrimpton Couture and The Glamporium. She did not have any special requests as far as what dish I made in honor of her, so I picked an outfit I loved and carried on with the Southwest-ish culinary theme.

Pork Loin Spirals With Corn and Black Beans
Inspired by Kelly Framel

Ingredients

1 c. black beans, cooked
1 c. corn, fresh shucked or thawed frozen
1/4 c. olive oil, plus extra to baste
2 Tbsp. sherry vinegar, plus extra to de-glaze
1 Tbsp. cumin
1 tsp. dijon mustard
1/4 tsp. salt, plus extra to season the meat
1/4 tsp. pepper, plus extra to season the meat
6 large garlic cloves, minced
Zest of 2 lemons, grated or minced
Juice of 1/2 lemon
4 inches fresh ginger, grated
2 pork tenderloin fillets, weighing about 1 1/4 lbs each
1/2 c. Manchego cheese, diced small

Directions

Mix all ingredients except the pork loin and Manchego in a container with a lid. Store in the fridge to marinate for 8-48 hours, stirring periodically.

Around the same time you assemble the filling, cut into each pork loin lengthwise. Stop at least 1/4" short of cutting it in half. Make another incision from the center moving outward. Again, do not cut all the way through. Unfold. Each loin should now be about 4 times its original width.

Spread the meat on a hearty surface that can take a good pounding. Cover it in plastic wrap and bang it with a mallet until it's good and flat. Season with salt and pepper. Store in the fridge until ready to cook.

Heat the oven to 400.

Saute the marinated filling over medium heat until the garlic grows soft and flavors the other components. Deglaze with additional sherry vinegar if necessary. This will take about 5-7 minutes, but if you were a chickenless cook, you would taste as you go ;)

Spread the pork flat in an oiled baking pan. Allow the filling to cool a few minutes, then divide it evenly between the two fillets and spread it over, leaving a border of 3/4" to 1". Sprinkle on the cheese. Roll the loins up lengthwise and secure with 6 or more pieces of kitchen twine each. Baste each loin with a bit of olive oil. Roast about 1 hour. Remove the twine and cut into rounds from top to bottom. Serves 6-8.


Dessert was inspired by this frock posted by Fleur de Guerre of Diary of a Vintage Girl. She, like Kelly, gave me free reign to choose from her oodles of fabulous photos. I imagine this one wouldn't have been her first pick; she's a self-described "part-time pinup girl and full-time Forties enthusiast," and this look is more 50s. But I'm sure she'll approve of the azure after-dinner cocktails I served in her honor.

Blue Hawaiian Pina Coladas
Inspired by Fleur de Guerre

Ingredients (Alcoholic Version)

4 oz. rum
2 oz. blue curacao
6 oz. unsweetened coconut milk
1 c. fresh pineapple chunks
1 1/2 Tbsp. sugar or simple syrup
10 ice cubes

Ingredients (Kid-Friendly Version)

6 oz. whole milk
6 oz. unsweetened coconut milk
1 c. fresh pineapple chunks
2 Tbsp. sugar or simple syrup
A few drops blue food coloring
10 ice cubes

Directions

Place all ingredients in a blender and run on high until smooth. Serves 4 (or 2 double-tall as pictured).

Thanks to everyone who participated in this challenge! If you haven't participated yet and you live on my side of the globe, it's not too late. Your time isn't up until the day is over...


Beat the eggs. Whip the cream. Show no mercy.


Thursday, January 21, 2010

Cake Enthusiast Dave Spencer Takes the Renaissance Cook Challenge


If you have been reading along with me for awhile, you may remember Dave Spencer as one of my Chickenless Cooks of the Week (a feature I have since discontinued, as it seemed to spotlight fantastic accomplishments without inspiring the "real" people who read my blog). Dave has stepped up to my Renaissance Cook Challenge by posting this hilarious podcast, starring his adorable family of superheroes! I could not be more tickled.

Remember, the deadline for this challenge is Tuesday the 26th- less than a week away. So what's YOUR other hobby? Remember to leave a comment or write dontbeawuss@gmail.com so I don't accidentally miss your post.


Beat the eggs. Whip the cream. Show no mercy.


Sweet Lentils Three Ways


From top: Curry Spiced Lentil Salad With Coconut, Lentil Cookies, Sweet 'n' Sour Lentil Stew With Poached Kumquats

In less than two weeks' time, I served uncommonly sweet lentils three ways... four if you want to count the Pineapple Crisp (I don't, given that it was a quick fix for Lentil Cookies gone awry). And the kicker is, I didn't realize I'd done it until this morning as I was reading back over my posts. Great inspiration if you happen to be as short on funds as I am, huh? Who needs three different sources of protein to keep meals interesting?

I pondered the phenomenon and came up with the following advice for repeating a culinary theme several times within a short duration.

1) If two ingredients pair commonly, such as lentils and rice, banish one of them for at least two out of three dishes.

2) Consider that you have a wide range of different courses to work with... appetizer, entree, dessert... One doesn't often put lentils in cookies, but hey, it worked (kinda).

3) Think different times of day. For example, I had my salad for lunch and my stew for dinner.

4) Alter your serving temperatures. The central ingredient should be flexible enough to eat hot, chilled, or at room temp.

5) Attempt different textures in each dish. Lentils are easy to mask, transitioning stealthily from a crunchy salad to a chewy cookie to a smooth stew; but you can even do this with a not-so-subtle ingredient like pork. Serve it grilled one night; braised, shredded, and wrapped in tortillas the next.

Have you ever repeated a culinary theme subconsciously? If so, what kept said theme so fresh?


Beat the eggs. Whip the cream. Show no mercy.


Tuesday, January 19, 2010

Technology Doesn't Love Me


As of today, The Chickenless Kitchen has 50 followers, which I am super psyched about!! I feel lucky to have so many readers who share my weird sense of humor and yet-weirder taste. Thank you all for visiting, and I look forward to sharing much more with you in the future.

While I'm on the subject of followers and such...

Technology doesn't love me as much as you guys apparently do (look at my blog template- just LOOK at it), but despite my dinosauristic tendencies, I have gotten around to some social networking recently:

1) You may now become a fan of The Chickenless Kitchen on Facebook

2) You may now follow @Chickenless on Twitter

3) You may now bookmark my recipes on Delicious by clicking the nifty icon that appears at the end

Last but ABSOLUTELY not least, thanks again to Cajun Chef Ryan, who recently granted me the privilege of a guest post on his tasty-tastic blog!

Now if I could pick all your brains for just a moment... What do you like about The Chickenless Kitchen so far? What could I improve? Please feel free to leave a comment or write dontbeawuss@gmail.com. Again, thank you so much for taking time out of your busy schedules to visit my little blog!


Beat the eggs. Whip the cream. Show no mercy.


Got Leftover Kumquats?


If not, that's all right- this recipe begs for substitutions. Try using different types of onions, different types of rice, a different lager, fennel in place of celery, or orange slices with their juice in place of kumquats with their poaching liquid.

Sweet 'n' Sour Lentil Stew With Poached Kumquats

Ingredients

2 Tbsp. olive oil
1 onion, diced large
2 cloves garlic, sliced
2 carrots, sliced
1 stalk celery, sliced
2 tsp. cumin
1 tsp. cinnamon
1/4 tsp. black pepper
Dried cayenne pepper to taste
1/2 c. fresh cilantro leaves, chopped
1 tsp. salt, divided
2 1/2 c. vegetable broth
1/2 c. Yuengling Lager
1 c. preserved tomatoes, diced (I really have got to get Pomi to advertise with me)
2 tsp. tomato paste
3/4 c. lentils, cooked
3/4 c. rice, cooked
1/2 of a poblano pepper; roasted, peeled, and chopped
2 Tbsp. kumquat poaching liquid
Juice of 1/4 lemon

Directions

In a stew pot, heat the olive oil over medium-high. Add the onion, garlic, carrots, celery, cumin, cinnamon, black pepper, and cayenne pepper. Saute until the onions are translucent, about five minutes.

Add the cilantro and 1/2 tsp. of the salt. Saute one minute more.

Add the broth, beer, preserved tomatoes, and tomato paste. De-glaze the pot. Bring contents to a boil, then reduce heat and let simmer over medium-low for 15 minutes.

Add the lentils, rice, poblano pepper, kumquats, poaching liquid, and remaining salt. Simmer 15 minutes more. Remove from heat and stir in the lemon juice. Serves 4.


Beat the eggs. Whip the cream. Show no mercy.


Monday, January 18, 2010

Kumquat Shortcake


Last night, friends treated my husband and me to a smashing roast chicken dinner (thanks again, Paul and Alice!) I volunteered to bring dessert. In recent weeks, I've had a hankering for something fruity and chile-influenced, which led me to poach these kumquats with a poblano pepper and serve them over a Sara Lee pound cake.

Oh, all right, you caught me.

The Sara Lee pound cake was a last-minute save. Anti-corporate control freak that I am, I made a batch of biscuits; but for some reason they came out tasting like bitterness incarnate. Will have to play around with that recipe for a bit and post it at a later date.

These kumquats, on the other hand, are to die for. Their tart-and-sweet flavor meshed excellently with the cinnamon, cloves, and chile.

Poached Kumquats With Poblano

Ingredients

2 pints kumquats
1/2 a poblano pepper
2 c. water
2/3 c. orange blossom honey
2/3 c. granulated sugar
3/4 tsp. cinnamon
1/8 tsp. ground cloves


Directions

Heat your broiler to the highest setting. Meanwhile, cut the kumquats into thirds horizontally (yes, you have to de-seed them, which is a pain; but it's not necessary to peel them.)

Place the pepper skin-side-up on an oiled baking sheet. Broil about five minutes, or until the skin is wrinkly and partially black on top. Remove and let cool. Peel off the skin.

Combine the water, honey, sugar, cinnamon, and cloves in a medium saucepan and bring to a boil. Add the kumquats and poblano, then reduce heat to medium-low. Simmer 20 minutes.


Remove the pan from the heat and let cool. Fish out the poblano, drain so that the poaching liquid runs back into the pan, and chop. Store the chopped poblano in a small container with a couple spoonfuls of poaching liquid to cover. Store the kumquats separately in the rest of the liquid. To serve, spoon the kumquats over any of the following (or something else that I haven't thought of):

Ice Cream
Cake
Biscuits
Sweet Cornbread
Corn Pudding
Bread Pudding
Fruit Salad
Pancakes
Crepes
Waffles
Cookies

Garnish with the chopped poblano. (Optional: Beat 2 Tbsp. of poaching liquid from the kumquats with 1 c. heavy whipping cream.) Serves 4-5.


Beat the eggs. Whip the cream. Show no mercy.


Delicious
Bookmark this on Delicious

Friday, January 15, 2010

Broccoli Salad With Golden Raisins, Olives, and Pickled Mirepoix Relish


My leftover steamed broccoli inevitably ends up in a cold dish, as reheating can make it mushy. I had tossed these little trees with salt, pepper, olive oil, and lemon juice during their first lives; so to dress the salad, all I used was a bit of additional olive oil.

Mirepoix refers to the French holy trinity of cuisine: onions, carrots, and celery. Tradition calls for two parts onion to one part each carrot and celery, a fact that I did not know when I made this pickled version. So if you're a publisher who has decided not to give me a cookbook deal based on that transgression, please keep in mind that, hey, now I know (though if you want an author who knows what the hells she's talking about, you're not the variety of publisher who would have given me a cookbook deal anyway).

Salad isn't the only use for Pickled Mirepoix Relish. You can sprinkle it on deviled eggs, thick soups, hot dogs... Maybe even dessert? Worth a shot. I see Pickled Mirepoix Cookies in my near future.

As mentioned at its first appearance on The Chickenless Kitchen, this brine recipe was adapted from the one for Fresh-Pickled Vegetables on page 220 of Alice Waters' The Art of Simple Food.

Pickled Mirepoix Relish

Ingredients

1/2 c. each carrot, celery, and onion, minced
1 batch of pickling brine, subbing an equal amount of sugar for the acai black currant syrup

Directions

Combine the veggies in a heatproof container. Set aside.

Bring the brine to a boil for five minutes. Pour the brine over the veggies. Strain immediately. Allow to cool, then store in the fridge for at least two hours before using. Makes 1 1/2 cups.


Beat the eggs. Whip the cream. Show no mercy.


Delicious
Bookmark this on Delicious

Thursday, January 14, 2010

The Melting Pot Method


You may have heard of the Clean Out Your Fridge Method: Take all the ingredients you have that are on their last legs and dump them into an egg-based dish.

The Melting Pot Method is a little different. While it can have the side benefit of cleaning out your fridge, the primary focus is getting foods that you associate with varying cultures to jive. This does not necessarily mean you need exotic imported ingredients; for instance, the pineapple in this recipe that I chose to associate with Hawaiian culture was locally grown here in Florida.


What process can you use to employ the Melting Pot Method in your kitchen?

Step #1

Choose from the variety of existent egg-based dishes. These include quiches, omelettes, frittatas, tortillas, skillets/scrambles, souffles... the list goes on. For this recipe, I started with the idea of making my egg-based dish a tortilla, which is Spanish in origin.

Step #2

Pick another region and choose two ingredients that could be associated with that region's cuisine. They don't have to be exclusive; for instance, I could associate "eggplant and onions" with pretty much anywhere bordering the Mediterranean.

Step #3... Here's the trick:

After you've come up with two ingredients other than eggs and the culture they represent in your recipe, put a twist on one of them. I chose a pig-and-pineapple combo that I associate with Hawaiian cuisine; but for my pig, I used Genoa salami rather than the traditional spit-roasted pork or... well, Spam. Going back to the eggplant-and-onion idea, let's say you choose to associate that with Italy. But if you use scallions instead of white onions, suddenly it's no longer strictly Italian-influenced. Get the idea?

Step #4

Add a coupla-few more ingredients based on the cultures you already have. At this juncture I added potatoes and onions, both of which appear frequently in traditional Spanish tortillas; and Parmesan cheese (Italian).

Step #5

Think of two more cultures that you haven't incorporated so far. My next idea was to add extra eggs for a thicker layer, bringing to mind a crustless version of the French quiche even as I steadfastly refused to call it a crustless quiche. And finally I threw in some pepper jack cheese to honor the good old U.S. of A.


See? Nothing to it. All you need are some good free association skills and enough self-respect to stay your hand when you're about to come up with something school-cafeteria-esque.

The Chickenless Chick's Melting Pot Tortilla

Ingredients

5 eggs
1/3 c. pepper jack cheese, cubed
1/4 c. Parmesan cheese, grated
1/4 c. water
6 slices cold cut Genoa salami, shredded
1 Tbsp. olive oil
1/2 white onion, sliced thin
1 russet potato, sliced thin
1 tsp. dried thyme leaves
1/2 c. pineapple, chopped
1/2 c. fresh cilantro leaves, chopped
Salt 'n' pepper to taste

Instructions

Heat the oven to 375.

Beat the eggs, cheeses, water, and salami together in a large mixing bowl. Set aside.

Heat the oil in a saute pan over medium high. Add the onions and saute two minutes. Add the potatoes and thyme leaves. Saute until the potatoes are soft, but not falling apart.

Add the pineapple, cilantro, salt, and pepper to the pan. Saute one minute more.

Add the contents of the pan to the egg mixture and stir well to incorporate. Pour into a greased 9" pie tin.

Bake at 375 for thirty minutes or until barely browned on top. Serves 6.


Beat the eggs. Whip the cream. Show no mercy.


Delicious
Bookmark this on Delicious

Tuesday, January 12, 2010

Renaissance Cook Challenge


Don't get me wrong, cooking is the spin on my world. But I do have other hobbies. For instance, I unabashedly bookmark style blogs (yes, those folks who take pictures of what they're wearing every day) and am quite the amateur stylist myself. If I had a walk-in closet, I would easily spend as much time there as in the kitchen. Before my husband and I arranged to spend this June through December clad in our unglamorous farming duds, I was even planning to start another blog called The Chickenless Wardrobe.

Now that you know my other hobby, I want to know yours. In the interest of well-roundedness, I hereby present to you my first Renaissance Cook Challenge!

Step #1

Pick a hobby other than cooking.

Step #2

Invent a dish inspired by said hobby. It can be a direct interpretation (example: frosting a cake to look like a soccer ball), or a loose one (example: arranging a dessert tray with all black-and-white foods).

Step #3

Post the results on your blog if you have one, or send pics to dontbeawuss@gmail.com so I can share them here.

The deadline for the Renaissance Cook Challenge will be Tuesday, January 26th. That gives you two weeks to pick a hobby and make your dish.

Have at it! Please feel free to post any questions you may have in the comments.

Addendum: My sharp-minded Foodbuzz buddy Ryan has brought up an excellent question: Are you allowed to re-post about foods you've already cooked? Sorry guys, but this is The Chickenless Kitchen. The point of my challenges is to expand your culinary horizons. So I'm going to have to be a big jerk and say no to that one. However, you may create a different dish inspired by the same hobby. Thanks for the question, Ryan!

Beat the eggs. Whip the cream. Show no mercy.


Sunday, January 10, 2010

Pineapple Crisp With Lentil Cookie Topping


I admit it: I've led you astray. Turns out those lentil cookies I told you about don't store well at all. The lentils in mine dried out forty-eight hours after they left the oven, and I imagine that in drier climates (read: anywhere but Florida) their lifespan would be even shorter.

I advise that you either make these treats in small batches only or have some other use in mind. Since crisp topping is supposed to be crunchy anyway, I opted to crumble up my dried-out cookies, sprinkle them over a pan of juicy seasonal fruit, and bake. Dessert doesn't get any easier or tastier than this.


Pineapple Crisp

Ingredients

1 1/2 pineapples, cut into chunks
1 Tbsp. flour
8-10 lentil cookies, crumbled

Directions

Heat the oven to 375.

Mix the pineapple chunks and flour. Put them in a 10" pie pan (bet you're jealous of the adorable one that my mom got me for Christmas).


Bake the pineapple chunks on their own for 20 minutes. Remove from the oven and sprinkle the cookie topping over. Bake until sufficiently browned on top, about 20-30 minutes more. If the topping browns too much before the pineapple is soft, cover with a sheet of foil for the remainder of the cooking time. Serves 6.


I attempted to make pineapple whipped cream, but it came out tasting an awful lot like regular whipped cream. In case you want to play around with the recipe, here it is. By all means, please contact me if you find a better way!


Pineapple Whipped Cream

Ingredients

3/4 c. heavy whipping cream
2 Tbsp. pineapple juice
1 Tbsp. sugar

Directions

Whisk or beat all ingredients with an electric mixer until stiff. Makes about 1 1/2 c. whipped cream.


Beat the eggs. Whip the cream. Show no mercy.


Delicious
Bookmark this on Delicious

Saturday, January 9, 2010

Lentil Cookies


You probably get bombarded with lies on this subject every day: "Don't worry, it's healthy but you still feel satisfied." "Tastes just like the real thing!" "Your kids will never know the difference if you substitute spinach for sugar." But the fact is, most diet desserts suck. And they will ultimately lead to a breakdown during which you will shovel too many un-diet desserts into your deprived piehole at one sitting.

All that said, PLEASE GIVE THESE COOKIES A CHANCE.

I know they sound like the Valium-fueled concoction of a 1970s ex-hippie supermom, but THEY REALLY DO TASTE GOOD. And if you are among my many vegetarian readers, you're sure to appreciate the extra protein that comes from combining lentils with oatmeal.

I adapted this recipe from the one underneath the lid of the Quaker Oats canister. The original is called Vanishing Oatmeal Raisin Cookies, a longtime favorite in my house. In addition to subbing lentils for 1/3 of the oats, I threw in some dried ginger and cloves, which I thought would complement the other flavors nicely and help disguise the lentils. And of course, you can use anything you'd like in place of the raisins. This time I went half and half with golden raisins and chocolate chips. On my list to try are dried apricot chunks, dried cranberries, dried blueberries, and candied ginger (preferably chocolate-covered).


Lentil Cookies

Ingredients

2 sticks butter (salted if desired), softened
1 c. firmly packed brown sugar
1/2 c. granulated sugar
2 eggs
1 tsp. vanilla
1 1/2 c. all-purpose flour
1 tsp. baking soda
1 tsp. cinnamon
1 tsp. dried ginger
1/8 tsp. dried cloves
1/2 tsp salt
2 c. oats (I used Quaker)
1 c. cooked lentils
1/2 c. chocolate chips
1/2 c. golden raisins


Directions

Heat the oven to 350.

Beat butter, sugars, eggs, and vanilla in a mixing bowl.

Combine flour, baking soda, cinnamon, ginger, cloves, and salt in a separate bowl, then incorporate this mixture into the wet ingredients.

Stir in oats and lentils.

Stir in chocolate chips and raisins.

Drop rounded tablespoons of dough onto an ungreased cookie sheet.

Bake 10-12 minutes at 350. Makes 4 dozen.


Beat the eggs. Whip the cream. Show no mercy.


Friday, January 8, 2010

Curry Spiced Lentil Salad With Coconut


I'm calling this Kelly and Casey's Salad, in honor of my good friends who would hate it. Kelly hates peas, Casey hates curry, and I can't imagine I got through composing the rest of the ingredients list without stepping on their picky toes.

Kelly and Casey's Salad

Ingredients

5 carrots, peeled and sliced
3 large boiling potatoes, parboiled and diced large
2/3 c. lentils, cooked until just tender
2/3 c. split peas, cooked cooked until just tender
2/3 c. black olives, chopped
1/3 c. olive oil
Juice of 1/2 a lemon
2 cloves garlic, pressed or minced
1 inch piece of fresh ginger, grated
2 tsp. dried cumin
1/2 tsp. salt
1/2 tsp. dried turmeric
1/2 tsp. dried coriander
1/4 tsp. dried cardamom
Dried cayenne to taste
1/2 c. chopped fresh cilantro
1/2 c. sweetened coconut flakes


Directions

Mix the carrots, potatoes, lentils, peas, and olives in a large container with a tight-fitting lid.

In a separate bowl, combine all remaining ingredients except for the coconut flakes and whisk together.

Pour the dressing over the salad contents, stir well, and seal the container. Let it marinate in the fridge at least 4 hours (an eight-hour work day is ideal). Thirty minutes before serving, add the coconut flakes and stir again, then leave the container on the counter until its contents are at room temperature. Serves 6-8 as an appetizer or light meal.


I served this salad with homemade pita chips and extra lemon wedges.

As always, I encourage you to play around with the recipe. For a creamy dressing, try adding plain yogurt or coconut milk. If you dislike the taste or texture of coconut, try subbing golden raisins, dates, or apples (fresh or dried).


Beat the eggs. Whip the cream. Show no mercy.


Thursday, January 7, 2010

Tiger Potatoes


They were going to be called "Zebra Potatoes" before I ran a Google search to see if anyone else had coined the term. Turns out "Zebra chip" is slang for a pathogen that makes potato chips come out all brown-streaked and weird looking. I opted not to willingly associate a potato-based side dish I'd made with a potato-attacking pathogen. Seemed like it would be both bad luck and a little gross.

You may have run across these Ze... ahem... Tiger Potatoes before. You may even have invented something similar yourself. They're very simple to make, and if anyone in your family prefers white potatoes to sweet, this is a great way to pump a few more vitamins into said heretic.

All you need are a russet potato, a sweet potato, and seasoning/garnish of choice to serve two.

Step #1

Peel your potatoes and cut wedges into the tops, leaving at least 1/4" of flesh in tact along the bottom. Reserve the wedges.


Step #2

Insert wedges into the potato of the opposite color as shown. If they don't quite fit, you can opt to trim them down or widen the crevices.


Step #3

Wrap each potato securely in a paper towel and place right-side-up in your microwave. Microwave on high for three minutes.

Step #4

Let cool a little bit before attempting to remove the paper towel, but don't wait too long or it will stick. Serve them up however you're inclined. I butterflied mine and added butter, salt, pepper, nutmeg, and a bit of fresh dill.


Have you ever made Tiger Potatoes? I imagine I'm not the first, and I'd do it again in a heartbeat. The only thing missing from mine was big dollops of sour cream. Wish I'd had some in the house.


Beat the eggs. Whip the cream. Show no mercy.